今回はアニメーションについて見ていく。アニメーションは大きく2種類(AnimationクラスとAnimationTimerクラス)に分けられ、アニメーションの考え方が少し異なるため分けてみていく。
■ Animationクラスを使ったアニメーション
アニメーションの始点・中間点・終点、補完方法を指定することにより、アニメーションを行うクラス郡。よく使われるアニメーションがインプリメント済みである。Animationクラスを継承した代表的なクラスは以下の通り。
| 主要なクラス名 |
内容 |
| FadeTransition |
フェードインやフェードアウト等、ノードの透明度アニメーションを行う |
| FillTransition |
ノード色について、アニメーションを行う |
| PathTransition |
ノード位置について、アニメーションを行う |
| RotateTransition |
ノードの回転について、アニメーションを行う |
| ScaleTransition |
ノードの拡大・縮小について、アニメーションを行う |
| StrokeTransition |
ノード外枠について、アニメーションを行う |
| TranslateTransition |
3Dノードの変換について、アニメーションを行う |
| PauseTransition |
アニメーションを一定時間停止(sleep)させる |
また、アニメーションさせるプロパティ値を明示的に指定する場合はTimelineクラスを利用する。Timelineクラスでは、キーフレーム時点でのノードのプロパティ値(KeyValue)と、キーフレーム間のプロパティ値の補完方法(Interpolator)を指定することにより、アニメーションを行う。利用するクラスは以下の通り。
| クラス名 |
内容 |
| Timeline |
始点と終点、時により複数の中間点でのプロパティ値を設定し、各点の補完方法(Interpolator)を指定することによりアニメーションを行うクラス |
| Interpolator |
キーフレームの補完方法を表すクラス |
| KeyFrame |
キーフレームを表すクラス |
| KeyValue |
キーフレーム時点での、プロパティ値を表すクラス。 |
また、上記で述べたクラスを順次および同時に行う場合には、以下の2クラスのいずれかを利用する。
| クラス名 |
内容 |
| SequentialTransition |
順次アニメーション。登録したアニメーションを順番に実行する |
| ParallelTransition |
同時アニメーション。登録したアニメーションを同時に実行する |
Animationクラス全体の特徴として、Animation.setCycleCount関数およびAnimation.setAutoReverse関数でアニメーションの繰り返し方法を指定できる。
繰り返し設定の注意点としては、『Timelineを無限にした場合、適切に停止(Strop関数呼出)しないと、メモリー・リークが発生する可能性がある』そうだ。
また、アニメーション途中で設定を変更することはできず、設定を変更する場合には一度アニメーションを停止させる必要がある。アニメーション設定を動的に変更するには、AnimationTimerを利用するとよい。
■ パス・アニメーション(Animation利用例1)
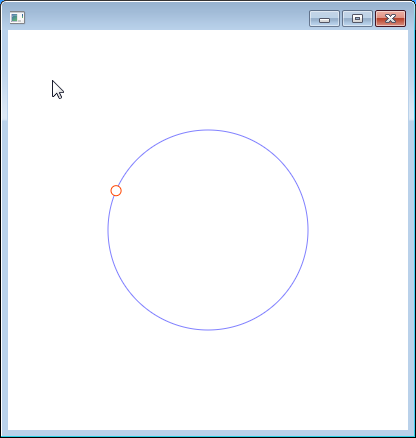
アニメーションの中でも分かりやすいPathTransition(ノードの移動)について、利用方法をサンプルを用いてみていく。青い円の円周上を赤い円が移動するサンプルとなっている。
◇ サンプルコード
package application_fx;


import javafx.animation.Interpolator;
import javafx.animation.PathTransition;
import javafx.application.Application;
import javafx.scene.Group;
import javafx.scene.Scene;
import javafx.scene.paint.Color;
import javafx.scene.shape.Circle;
import javafx.stage.Stage;
import javafx.util.Duration;

public class TestAnimation extends Application {

    public static void main(String[] args)
    {
        launch( args );
    }

    @Override
    public void start(Stage primaryStage) throws Exception
    {
        // シーングラフを作成
        Group   root    = new Group();

        // シーングラフに青色の円を追加
        Circle  circle  = new Circle( 100 );
        circle.setFill( null );
        circle.setStroke( Color.BLUE );
        circle.setLayoutX( 200 );
        circle.setLayoutY( 200 );
        circle.setOpacity( 0.5 );
        root.getChildren().add( circle );

        // シーングラフに赤色の円を追加
        Circle  redCircle  = new Circle( 5 );
        redCircle.setFill( Color.WHITE );
        redCircle.setStroke( Color.ORANGERED );
        root.getChildren().add( redCircle );

        // 赤色の円に移動アニメーションを追加
        PathTransition pathTransition   = new PathTransition();
        pathTransition.setNode( redCircle );                                // アニメーション対象ノードを登録
        pathTransition.setDuration( Duration.millis( 5000 ) );              // アニメーション1サイクル分の時間を設定
        pathTransition.setPath( circle );                                   // アニメーションの軌道を設定
        pathTransition.setInterpolator( Interpolator.LINEAR );              // アニメーション補完方法を線形に設定
        pathTransition.setCycleCount( PathTransition.INDEFINITE );          // 無限アニメーションに設定


        // シーンを作成
        Scene scene = new Scene( root , 400 , 400 );

        // ウィンドウ表示
        primaryStage.setScene( scene );
        primaryStage.show();

        // アニメーション開始
        pathTransition.play();
    }

}
◇ 実行結果
◇解説
アニメーションの実装部分としては以下の通り
- (42行目)アニメーションオブジェクト(ノード移動用)を作成
- (43行目)アニメーション対象ノードを登録
- (44行目)アニメーションの時間を設定。5000ミリ秒をかけてアニメーションを実行するように設定している
- (45行目)アニメーション軌道を設定。設定した図形の外枠上を移動する。ここでは青い円の円周上を移動することになる。JavaDocをぱっと見た感じでは始点の指定関数はないため、図形毎に始点が決まっている模様。
- (46行目)アニメーションの補完方法を指定。ここでは線形補正(一定のスピードで移動)を指定している
- (47行目)アニメーションの繰り返しを無限に設定。青の円周上を1周することを、無限に繰り返している
- (57行目)アニメーションを開始している。
■ タイムライン・アニメーション(Animation利用例2)
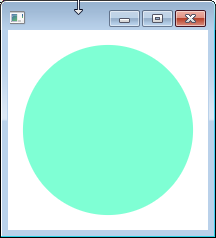
キーフレーム・アニメーションの例をサンプルを用いてみていく。サンプルでは表示された円の大きさが時間とともに変化する。
◇ サンプルコード
package application_fx;


import javafx.animation.Interpolator;
import javafx.animation.KeyFrame;
import javafx.animation.KeyValue;
import javafx.animation.Timeline;
import javafx.application.Application;
import javafx.scene.Group;
import javafx.scene.Scene;
import javafx.scene.paint.Color;
import javafx.scene.shape.Circle;
import javafx.stage.Stage;
import javafx.util.Duration;

public class TestAnimationTimeline extends Application {

    public static void main(String[] args)
    {
        launch( args );
    }

    @Override
    public void start(Stage primaryStage) throws Exception
    {
        // シーングラフを作成
        Group   root    = new Group();

        // シーングラフに円を追加
        Circle  circle  = new Circle();
        circle.setRadius( 15 );
        circle.setLayoutX( 100 );
        circle.setLayoutY( 100 );
        circle.setFill( Color.AQUAMARINE );
        root.getChildren().add( circle );

        // シーンを作成
        Scene scene = new Scene( root , 200 , 200 );

        // ウィンドウ表示
        primaryStage.setScene( scene );
        primaryStage.show();

        // テキストアニメーションを開始
        Timeline timeline   = new Timeline();

        KeyValue kv0        = new KeyValue( circle.radiusProperty() , 15 );
        KeyFrame kf0        = new KeyFrame( Duration.ZERO , kv0 );

        KeyValue kv1        = new KeyValue( circle.radiusProperty() , 100 , Interpolator.EASE_BOTH );
        KeyFrame kf1        = new KeyFrame( Duration.millis(1000) , kv1 );

        KeyValue kv2        = new KeyValue( circle.radiusProperty() , 0 , Interpolator.EASE_OUT );
        KeyFrame kf2        = new KeyFrame( Duration.millis(2000) , kv2 );

        KeyValue kv3        = new KeyValue( circle.radiusProperty() , 15 , Interpolator.EASE_IN );
        KeyFrame kf3        = new KeyFrame( Duration.millis(3000) , kv3 );

        timeline.getKeyFrames().add( kf0 );
        timeline.getKeyFrames().add( kf1 );
        timeline.getKeyFrames().add( kf2 );
        timeline.getKeyFrames().add( kf3 );
        timeline.setCycleCount( Timeline.INDEFINITE );
        timeline.setAutoReverse( true );
        timeline.play();

    }

}
◇ 実行結果
◇ 解説
アニメーションの実装部分としては以下の通り
- (44行目)タイムラインを作成
- (46行目~47行目)0秒時点でのキーフレームを作成。アニメーションさせるプロパティ値として、円の半径を指定
- (49行目~56行目)1秒、2秒、3秒の各時点でのキーフレームを作成。円の大きさを変えている。Interpolator.○○は補完方法を指定しており、EASE_INはアニメーションがなだらかに始まり、EASE_OUTはなだらかに終わる。EASE_BOTHは両者を合わせたもの。
- (58行目~61行目)事前に作成したキーフレームをタイムラインに登録している
- (62行目~63行目)繰り返し方法を『アニメーションが終わると逆再生する』ことを無限に繰り返すように設定
- (64行目)アニメーションを開始
■ AnimationTimerクラスを使ったアニメーション
一定間隔で呼び出される関数をプログラマが実装することでアニメーションさせるクラス。自由度の高いアニメーションが実現できる。Swingで描画関数(JComponent.paintComponent関数)を実装するようなイメージと思えば分かりやすいかも。
■ テキストアニメーション(AnimationTimer利用例1)
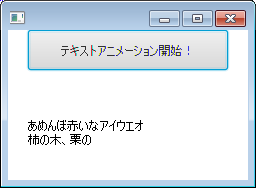
テキストをコマ送りするアニメーションのサンプルコードを以下に示す。ウィンドウに表示されたボタンを押下すると、テキストアニメーションが開始される。
◇サンプルコード
package application_fx;


import javafx.animation.AnimationTimer;
import javafx.application.Application;
import javafx.event.ActionEvent;
import javafx.scene.Group;
import javafx.scene.Scene;
import javafx.scene.control.Button;
import javafx.scene.text.Text;
import javafx.stage.Stage;

public class TestAnimationTimer extends Application {

    public static void main(String[] args)
    {
        launch( args );
    }

    @Override
    public void start(Stage primaryStage) throws Exception
    {
        // シーングラフを作成
        Group   root    = new Group();

        // シーングラフにテキストを追加
        Text    text    = new Text( "あめんぼ赤いなアイウエオ\n柿の木、栗の木、カキクケコ" );
        text.setLayoutX( 20 );
        text.setLayoutY( 100 );
        root.getChildren().add( text );

        // 青色の円にアニメーション・タイマーによる自由アニメーションを追加
        TextAnimation textAnimation = new TextAnimation( text , 200 );


        // シーングラフにボタンを追加
        Button  button  = new Button( "テキストアニメーション開始!" );
        button.setPrefSize( 200 , 40 );
        button.setLayoutX( 20 );
        button.setLayoutY( 0 );
        root.getChildren().add( button );


        // ボタン押下時のイベント・ハンドラとして、
        // 振動アニメーションを開始する関数を登録
        button.addEventHandler( ActionEvent.ACTION , (event) -> textAnimation.start() );

        // シーンを作成
        Scene scene = new Scene( root , 240 , 150 );

        // ウィンドウ表示
        primaryStage.setScene( scene );
        primaryStage.show();

    }

    /**
     * start関数呼出し後、一定期間振動するアニメーション
     */
    private class TextAnimation extends AnimationTimer
    {
        // アニメーション対象のノード
        private Text    node    = null;
        private String  str     = null;

        // テキスト・アニメーションのコマ送り間隔(ミリ秒)
        private long    duration    = 1;

        // テキスト・アニメーションの開始時間
        private long    startTime   = 0;


        /**
         * アニメーションを初期化する
         * @param node  アニメーション対象ノード
         * @param x     円移動アニメーションの中心X座標
         * @param y     円移動アニメーションの中心Y座標
         */
        public TextAnimation( Text node , long milliSec )
        {
            // 内部変数の初期化
             this.node      = node;
             this.str       = node.getText();
             this.duration  = milliSec * 1000000L;

             // 表示テキストを空文字に設定
             this.node.setText( "" );
        }

        @Override
        public void handle(long t)
        {
            // アニメーション開始時間を取得
            if( startTime == 0 ){ startTime = t; this.node.setText( "" ); }

            // アニメーション・タイムスタンプを初期化
            if( node.getText().length() < str.length() )
            {
                // 出力文字数の計算
                int count   = (int)( ( t - startTime ) / duration ) ;
                if( count > str.length() + 1 ){ count = str.length() + 1; }

                // 文字出力
                if( count > 0 ){ node.setText( str.substring( 0 , count - 1 ) ); };

            }else{
                // 変数を初期化し、アニメーションを停止
                startTime   = 0;
                stop();
            }

        }


    }

}
◇実行結果
◇ 解説
- (60行目~115行目)新規作成したテキストアニメーションクラス。AnimationTimerクラスはhandleをオーバーライドする必要がある。handle関数が描画タイミングで呼び出され、引数としてナノ秒の精度のタイムスタンプ(エポック秒?)が渡される。
- (79行目~88行目)アニメーション対象のTextノードと、コマ送りの間隔(ミリ秒)を受け取り、内部変数に登録。この際、Textノードに登録された文字列を退避し、空文字を新たに設定する。
- (91行目~112行目)描画タイミングで呼び出される関数。アニメーション開始時からの時間を取得し、何文字出力するか計算。setText関数で出力文字を設定している。
- (33行目)テキストオブジェクトと文字コマ送りの間隔(ミリ秒)を指定して、作成したテキストアニメーションのインスタンスを生成。
- (46行目)ボタン押下時のイベント・ハンドラ内でアニメーションをスタートするように設定
■ 画像アニメーション(AnimationTimer利用例2)
一定間隔で画像を変化(ぱらぱらアニメの動作)させるアニメーションのサンプルコードを以下に示す。サンプルでは32x32ピクセルの画像チップを3行2列並べた画像を用意し、表示するチップを切り替えることで画像アニメーションを実現している。
◇ サンプルコード
package application_fx;


import java.io.File;

import javafx.animation.AnimationTimer;
import javafx.application.Application;
import javafx.scene.Group;
import javafx.scene.Scene;
import javafx.scene.image.Image;
import javafx.scene.image.ImageView;
import javafx.scene.paint.Color;
import javafx.scene.shape.Rectangle;
import javafx.stage.Stage;

public class TestAnimationTimer2 extends Application {

    public static void main(String[] args)
    {
        launch( args );
    }

    /**
     * 【シーングラフ構成】
     *  root
     *  ┗ charaImg
     *    ┗ ImgView
     *     ┗ img
     */
    @Override
    public void start(Stage primaryStage) throws Exception
    {
        // シーングラフを作成
        Group   root        = new Group();

        // 画像アニメーションクラスを追加
        Group   charaImg    = createAnimationImage();
        charaImg.setLayoutX( 100 );
        charaImg.setLayoutY( 50 );
        root.getChildren().add( charaImg );

        // シーンを作成
        Scene scene = new Scene( root , 240 , 150 , Color.web( "9FCC7F" ) );

        // ウィンドウ表示
        primaryStage.setScene( scene );
        primaryStage.show();

    }

    private Group createAnimationImage()
    {
        // アニメーション・イメージのルート・ノードを作成
        Group       charaImg    = new Group();

        // 画像ノードをルートに追加
        Image       img         = new Image( new File( "img/chara.gif" ).toURI().toString() );
        ImageView   imgView     = new ImageView();
        imgView.setImage( img );
        charaImg.getChildren().add( imgView );

        // 画像の位置・クリッピング図形の位置を定期的に変更するアニメーションを追加
        new ImageAnimation( imgView , 32 , 32 , 3 , 2 , 0 ).start();

        return charaImg;
    }

    /**
     *  画像をimgRow * imgColumn個のチップに見立て、
     *  行指定で画像アニメーション(ぱらぱらアニメ)を実行する
     *  アニメーションタイマー・クラス
     */
    private class ImageAnimation extends AnimationTimer
    {
        // アニメーション対象ノード
        private ImageView   imgView     = null;
        private int         imgRow      = 1;
        private int         imgColumn   = 1;
        private int         index       = 0;

        // クリッピング領域
        private Rectangle   clipRect    = null;
        private int         clipWidth   = 0;
        private int         clipHeight  = 0;

        // アニメーション間隔(nano sec)
        private long        duration    = 500 * 1000000L;   // 500ミリ秒
        private long        startTime   = 0;

        public ImageAnimation( ImageView imgView , int clipWidth , int clipHeight , int imgRow , int imgColumn , int index )
        {
            // 内部変数の初期化
            this.imgView    = imgView;
            this.clipWidth  = clipWidth;
            this.clipHeight = clipHeight;
            this.imgRow     = imgRow;
            this.imgColumn  = imgColumn;
            this.index      = index;

            // クリッピング領域の作成
            this.clipRect   = new Rectangle( clipWidth , clipHeight );
            this.clipRect.setLayoutX( 0 );
            this.clipRect.setLayoutY( 0 );
            this.imgView.setClip( clipRect );

        }

        @Override
        public void handle( long now )
        {
            // アニメーションの開始時間を取得
            if( startTime == 0 ){ startTime = now; }

            // 表示列を計算
            long    count   = ( now - startTime ) / duration;
            int     column  = (int) ( count %imgColumn )  ;

            // クリッピング領域の移動
            clipRect.setLayoutX( clipWidth * column );
            clipRect.setLayoutY( clipHeight * index );

            // 画像位置の変更
            imgView.setLayoutX( -1.0 * clipWidth * column );
            imgView.setLayoutY( -1.0 * clipHeight * index );

        }


    }

}
◇ 使用画像(img/chara.gif)

◇ 実行結果

◇ 解説
AnimationTimerの使い方はテキストアニメーションの節(ページ上部)にて記述しているので割愛。
- 表示する画像チップの切り替えには、クリッピング機能を利用している。クリッピングとは画像の一部のみを表示する機能である。104行目のsetClip関数で引数として渡した図形(四角形)の領域のみが表示されるようになる。
- AnimationTimer.handle関数では、クリッピング領域を示す図形の位置を変更(119行目~120行目)することで、チップの切り替えを行っている。
- チップの切り替えだけでは表示位置がずれてしまうため、同時に画像全体の位置を変更する(123行目~124行目)。これにより、一定時間で表示されるチップが入れ替わり、画像がアニメーションしているように見える。
■ 参照
- JavaFX: 変換、アニメーションおよび視覚効果
- JavaDoc - クラスAnimation
- JavaDoc - パッケージjavafx.animationの階層